2020. 3. 4. 18:24ㆍ카테고리 없음

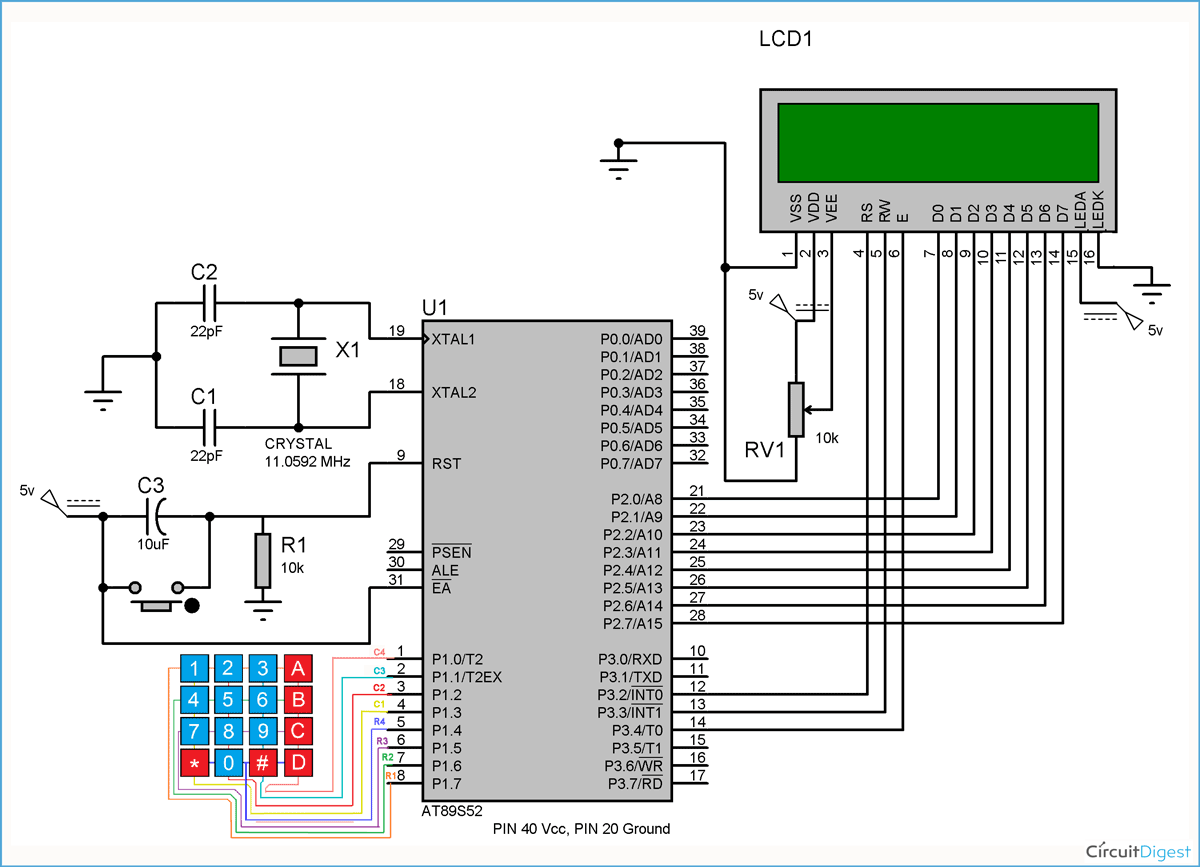
This post provides the keypad interfacing code ( using c language ) for 8051 micro-controller ( e-g for AT89C51 or AT89C52 etc ). This code is written in such a way that, when we press any key on the keypad then that value is displayed on the LCD.The code and Proteus simulation is given in the ‘ Downloads‘ section at the bottom of this page. It is assumed that you know how to interface LCD with 8051 micro-controller in 8bit mode. If you don’t, then please read first.The circuit required is shown below.Figure 1.

Keypad interfacing with 8051A crystal of 11.0592 MHz is used here. You can use any crystal value from 3 to 24MHz with 8051.
As we know that 8051 micro controller has an architecture which executes an instruction in 12 CPU cycles 1, hence this 11.0592Mhz crystal makes this 8051 run at 0.92 MIPS (Million of instructions per second).Port 2 is being used to write data on the LCD. Also, P3.7 pin is used as RS (Register Select for LCD) and P3.6 pin is used as E (Enable pin for LCD). Port 1 is used here to interface the keypad. P1.0 to P1.3 pins are used for the rows and P1.4 to P1.7 are used for the columns of the keypad.Following figure shows the pin assignment in the code 2.
You can easily change any pin as required by your circuit, by just changing these pin assignments. For example, to change RS pin from P3.7 pin to P3.0 pin just change the “sbit RS = P3^7;” line with “sbit RS = P3^0;”.Figure 2. Pin assignment in the codeHow to detect pressed key value?When key 1 is pressed then RowC wire is shorted with C1 wire inside the keypad. Similarly, when key 9 is pressed then RowA wire is shorted with C3 wire. This behavior is true for all the keys. Then the next question is, how to detect this behavior in the micro-controller code?We can detect pressed key value in the micro-controller using the “Scanning Algorithm Code”. This algorithm is written with the name of ‘ READSWITCHES‘ function in the code.
This function is shown below.Figure 3. Pressed key value detection codeIn the scanning algorithm ( i-e READSWITCHES function ), we test Row A keys first by making RowA wire equal to zero and making other rows one. Then each column is checked if it is equal to zero. Then RowB wire is made zero, while making all other rows one. Then again each column is checked to detect if any RowB key is pressed. This pattern is repeated for every row. If no key is pressed, then ‘n’ value is returned from the function.For example, if key 7 was pressed when this code was being executed then C1 will be zero ( Because keypad shorts the corresponding row and column wire ). “if( C1 0 )” condition will become true and there is a small delay of some micro seconds after which “while( C1 0 );” statement is present.
Keyboard Interfacing With 8051+mazidi
This statement basically makes the controller to wait until the key is no longer pressed, to remove the possibility of reading one pressed key many times. After that, the value of the key ( i-e ‘7’ in this case ) is returned from the function.“ READSWITCHES” function is basically used in the “getkey” function ( which is used in the main function ). This function is also shown in the figure 3 above. This function waits until a key is pressed ( i-e this function is a blocking function ). When a key is pressed then the value of pressed key is returned from the function. Main function codeThe code for the main function is shown below.Figure 4.
Main code for interfacing keypad with 8051In the main function, LCD is initialized and after that code enters a while(1) loop. In this loop, getkey function reads any pressed key value from the keypad. When a key is pressed, then the value of the key is stored in the ‘ key‘ variable as shown in the code above.
Keypad Interfacing With 8051 In Proteus

After that, LCD screen is cleared. And the value of the key is displayed on the screen using the writedata function ( which writes given character on the LCD ).You can leave your comments in the comment section below. Notes and References1 From2 This code was compiled using Keil uvision4 software. It is provided in the ‘ Downloads‘ section at the bottom of this page.